Tuesday, August 27, 2013

Why "Full n By"?

I've been asked by more than a couple of folks now. "What's up with the blog name "Full n By?"

Most sailors already get this...but for anyone not familiar, here is the explanation.

Sailing is much much different than "boating"...specifically "power boating". It's not bragging....it's just a fact.
Powerboating - Fun....but a Different Experience Entirely

There is a lot more cerebral and physical effort involved in getting a sailboat to go....and go at only a fraction of the speed a powerboat will go with far less effort. For many of us...this is not a reason to avoid sailing, ...in fact.....it's a reason to embrace it. Why? Because in general...if you find sailing satisfying at any level, you are someone gratified by hard work and the resulting rewards. Sailing is shunned by those of the "I gotta have it now..I'm not willing to work for it...and oh, by the way...look at me while I do this!" crowd. It's too much effort for most them, for too little reward, over too much time. We've had powerboats and they are fun, but driving a powerboat is a mechanical set of skills.....while sailing is an art-form that is never truly mastered.

A huge difference between sail and power is that you can point a power boat where you want to go, shove the throttles forward...an go direct. It matters not the the wind's direction (within reason of course).  If you sail, you know that is not the case with a sailboat. "No-Man's Land" lives within a 40-50 degree arc either side of heading
directly to windward. Mother nature attempts to keep this zone her private domain from where she generates the winds that we crave so much and she claims it as her own.  Should you attempt to sail your vessel directly into this region, all matter of chaos will befall your vessel as sails luff, then slat. Sheets attached to flogging clews fly around like demons attempting to foul on any appendage within their reach, threatening to pummel any mere human who would arrogantly attempt to tame them. All forward progress of the vessel is halted by her incredibly powerful hand against the bow of the boat. "No Man's Land"....You can't go there in a sailboat.

Or can you?

Since the days of the tall ships and before, 'till this day....no-one has been able to devise a vessel that can penetrate Mother Natures wind factory, within the No-Man's Land, 45 degrees (give or take) either side of the true wind direction.

Square Riggers were happy downwind and reaching,
but not so much upwind
We humans though....we don't like to take "No" for an answer. That trait has been our Savior throughout the history of man....and at times it's been our downfall. We are a stubborn bunch and if we can't get what we want one way...we figure out another approach, again and again, and again until we find a way. Such is the Art of Sailing. Initially just having the wind power your vessel the way the wind wanted to take you was a glorious achievement. It meant that half of the time, more if you planned it right, you could suspend the effort necessary to travel and simply harness Mother Nature to do it for you.


Eventually though...as always...we became dis-satisfied with only going "with" the wind. Soon, vessels were developed with rigs that could sail "across" the wind.


Modern Rigs Opened Up Upwind Sailing
Dauntless "gettin' her groove on" 
Even with this revelation we were not satisfied. Alas, vessels with sail plans that mimic vertical airfoils and can generate lift were developed....and we could sail "into" the wind.....BUT still only up the limits of "No-Man's Land" (within 40-50 degrees of the apparent wind direction). However...take any chart and layout two courses at approx 45 degrees angle to either side of directly upwind. Next, if you choose a point directly upwind of your current position, you can lay out a plan zigging and zagging back and forth on those two available course to get to your objective. No matter where it is. We refer to it as tacking upwind or "beating".

Good sailors know about two things that affect the wind direction the boat feels (which we call the "apparent wind"). The Apparent wind is the combination of the True wind and the wind actually created by the boat moving forward through the air. When the True wind shifts direction slightly, OR if the True wind changes its velocity...the "apparent wind angle" that the boat and sails sense will change direction accordingly.

If we are trying to move the boat directly upwind we want to sail the boat as close to that magical 45 degree  line to the Apparent wind as we can before entering No Man's Land. That way for every mile of distance traveled straight ahead (45 degrees off of our target) we get the most travel upwind (towards our target) . Part of our speed is taking us towards our objective closing the gap...but since we cannot go direct to the objective...part of our  speed is just moving us forward in a direction we don't really need to go. We want to minimize the latter and maximize the part going towards our objective. That part of the speed is called Velocity Made Good.

Our target is fixed.... a marina...an island....a buoy...a point of land ...etc. It does not move or change it's position. However...the direction of the wind is NOT constant. As we said...ANY change in velocity or True wind's direction will be seen by the sailor on the moving boat as a shift in the "Apparent Wind's" direction. If the Apparent wind direction moves more in front of the the boat we call that a "header" and the boat must be accordingly be steered away from the ultimate target to keep the angle of the sails constant to the angle of the wind, otherwise the sails enter "No Man's Land" as the angle of the sails to the Apparent wind becomes critical and the sails luff. Likewise, if the Apparent wind's direction moves aft,  around more to the side of the boat...we call that a "lift" and the boat can be turned more towards our objective that is directly upwind without luffing the sails.

Obviously if the desire or objective it to reach that target directly upwind from where you started, a header is a bummer. It causes the proportion of the distance you traveled that actually takes you toward that object to diminish as you turn away to keep the sails out of No Man's Land. A Lift however is awesome! It will allow you to turn the boat's direction even closer to your ultimate goal while still not putting the sails in the thrashing luffing limbo of No Man's Land.

working the lifts to gain ground to windward
One thing that really is cool is that a wind shift that causes a header when you sailing a starboard tack, becomes a lift on a port tack. So when headed by the wind, you can gain an advantage by simply tacking over to the other windward course and you will automatically be "lifted" by an equal amount, gaining an advantage toward your objective.

Often, especially when the wind is gusty the boat is receiving "lifts"  and "headers" pretty regularly every time the wind speed increases or decreases. Remember, an increase in True wind velocity always results in the apparent wind direction moving aft or around the side of the boat. When that happens you can steer a course higher up into what would have been No Man's Land just before the increase in velocity. You can hold this course until the gust subsides...at which time the apparent wind will rotate back forward again forcing you to bear away or turn away from your objective in order to keep the sails from entering No Man's Land.  THIS is sailing FULL n By. You are sailing with the sails trimmed for upwind work (sheeted in tight) and left there. You do not adjust the sails further once you have them set to drive the boat as close to the wind as you can (somewhere around that magical 45 degree rage). Rather than adjust the sails with their sheets when a header or lift comes, you effectively adjust the sails by steering the whole boat (which in turn turns the entire rig and thus the sails, in relation to the wind). You are trimming your sails effectively with the tiller...and you take EVERY advantage of every Lift to drive the boat higher towards your objective upwind. If you get a header...and you suspect that the header that is making you turn away from your objective upwind is going to last a while, you tack the boat over..why?  Yes! because you just turned that header that was making you turn away from your objective...into a lift that will allow you to turn to a heading closer to it on the opposite tack!...thereby making a shorter distance to the objective, increasing your Velocity Made Good,  and you get there faster.

So...Full n By  =  Keeping the sails sheeted-in for upwind work and steering the boat to Keep the SAILS FULL AND steering the boat BY the sail's relation to the wind in order to achieve your objective. It matters not what you compass course is...what matters is you sail the boat at an angle as close to "No Man's Land" as you can, recognize the headers and lifts, and shift course accordingly. You know where you want to get...and you will get there. It is rarely a constant direction, though, on either tack when sailing Full n By.  It is one that requires constant evaluation of conditions and options, and reactions appropriate to gain the best advantage and achieve your goal. Constant attention to detail and adjustment of the course yields the fastest path to the objective

Sailor or not....that concept should be familiar to us all.  Know it or not....Full n By is how most of us live our lives. We have a goal in mind. When we choose that goal...we layout a course to achieve it. Except for the simplest of goals....seldom are we able to achieve it without some course modifications. External forces always come into play. I guess the trick is to keep your eyes upwind and adjust course accordingly. Ride the lifts and tack on the headers.  I know I've been adjusting course a lot lately....fortunately for me ..Upwind, rail down, seems to be where I do my best work...and  is my favorite point of sail.


Monday, August 26, 2013

"Scout" -Really coming together now

Installing Yuloh Storage Bracket
Today was a good day. The weatherman, although he pounded most of the State with heavy thunderstorms, gave us a wonderful day.The temps felt more like late October, than August. I spent all last night and today working on "Scout". 

It would have been a sensational day on the water if the summer powerboat traffic wasn't so heavy. I bet the early morning was beautiful before they all got out there. Soon the lake will belong to us again! 


Making Aluminum Brackets for Mainsheet Camcleat

 This year will be different for me. I am planning on not putting Dauntless in the water for the season...at least not right away. I want to do some projects to her interior and also could really use to save the slip fee $. Plus...."Scout" will finally be ready! It's inevitable now! I am literally within  a couple afternoon's work on being ready to splash her for the first time.


Kiko snagged a pic of me working installing mainsheet system

Today was the first time she has seen her whole rig in place. I didn't actually raise the sail yet. I have a few more things to complete (a camcleat and a pulley or two) and it was pretty windy. But...I had the boom and sail suspended from the topping lift and have worked out how the furling gear, halyard, and topping lift will work. I also have the rudder lift system and steering line system completed. 


Some Paradox info:

When I first became aware of the Paradox, I knew I liked the concept..but I didn't fully understand some of the design until after I owned one!  The Vent Box was one concept I just had a hard time grasping and no-one seemed to have shown it much or explained how it worked or what is for. So, I thought I would give it a shot in cast a prospective builder might benefit from it. Here goes: 

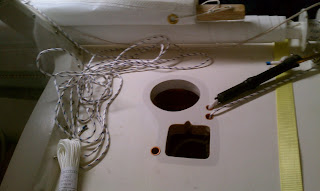
Almost Completed Vent Box
4th side still not attached, baffle visible
The Paradox has a very unique system called a "Vent Box" that I have never seen before, but that is found in Matt Layden designs. The vent box solves numerous problems. 

1. Leaking Mast Partners - a common problem with keel stepped masts. 

The Paradox's mast is stepped through the deck and goes all the way to the floor of the boat where it sits in a socket. While this gives great strength, one issue always present with this system is leaking of water around the mast where it penetrates the deck. This is even more difficult to address in a boat where the mast is inserted and removed each time the boat is sailed. That prevents any of the normal solutions to leaks around the mast from being employed. How does the vent box solve this. Simple. It Allows the mast/deck socket to leak all it wants!  What??? you ask. Yep...let it rain! Picture the vent box as an upside down pyramid within the boat. The top/tip of the pyramid sits on the floor and is slightly squared off.  The base of the upside down pyramid is actually connected to the underside of the deck. The hole in the deck that the mast enters through is within the "base" of the pyramid. This means that any water that enters the mast partners drains directly into the pyramid. Hmmmmm.. "What happens when the pyramid fills up?" you ask. Good question....cause it can't. Why? Because Matt designed a 1 inch drain in the tip of the pyramid (remember it's upside down so this is the bottom of the boat) right out the bottom of the boat. Water can literally pour into the mast partners and the interior of the boat itself, never sees a drop! Ingenious! If you can't beat leaking mast partners...EMBRACE them! 

But wait!  We aren't done with the wonders of the Vent Box! 

2. Interior Airflow!!!! 


Square hole is for mast, round hole is an Air Vent. Both open
int the "inside" of the Vent Box

"WHAT??"  Yes!  Airflow!  If you look at the Paradox you will see a huge 6 inch circular hole in the deck right next to the square hole where the mast inserts. Did someone mis-measure? Nope!  That's the design. It's an air vent system!


Close-up of Mast hole and Vent Hole...small holes are for
Control lines and black think is the Boom Strop (more on that
in another post 
.)
 "But how can that not allow a ton of water into the boat?" Well....we are back to the Vent Box. Air can enter the vent box via the huge hole in the deck.....on the inside of the boat there is another huge 6 inch hole in the rear side of the vent box pyramid (see picture above). The inside hole faces the skipper. The hole is made very high in the vent box almost at deck level. Air can enter the big hole on deck and exit into the cabin through the hole on the rear inside of the vent box. "But what if a wave or rain comes in with big-time water???  Doesn't that allow water into the cabin?"  NOPE!!!  :-) 
 Matt thought of that too. There is a baffle inside the vent box. The air must travel in the hole on the deck and then down to the bottom of the Vent Box to get around the baffle that is hung from the top of the vent box on the inside. Once airflow enters the box at deck level in the front of the box (and in front of the baffle) it travels down to the bottom of the box, around the bottom of the baffle (which only goes 2/3rds of the way down the inside of the box)...and then back up the backside of the baffle to the large exit hole that allows it into the cabin.  Much like the principal of a dorade box.  Any water that comes into the vent hole is directed by the baffle downwards where it exits out the 1" drain. It cannot make the corner to travel all the way back up the vent box on the backside in order to get through the cabin vent hole. WALA!!  Nice dry ventilation.!!  (If you are up on ventilation of a closed area you realize that you must have an opening  for air to escape in order for air to enter.  Herein lies a second purpose for the baffle at the back of the boat where the tiller enters into the cabin. It does double duty as an exhaust air vent if the cabin is closed up.)

3. Leads Control lines to Interior.


The Paradox is designed so that it can be sailed and controlled completely from inside the boat with the hatch closed, if necessary, for inclement weather or temps. So...How do you get control lines for halyard, reef, and topping lift through the deck and into the cabin without allowing water to leak in? Anyone that knows small boats knows that ..... You DONT!!  Instead..the location that the control lines enter the deck is,,,,you guessed it....within the confines of the vent box! Let it Rain!!!  They are then routed around the internal baffle within the box before exiting the box on the dry side of the box through brass tubes led to cam-cleats on the backside of the vent box itself. Any water that enters the control line's entry points goes right to the 1" drain and out the bottom of the boat. 

I am new to this system and have not been able to use it just yet...but reports from other Paradox owners report it works brilliantly. 

During construction pulleys, electrical connections for the mast, control lines, eyestraps, and the lightning protection system contacts (yes, that's what I said ...more on that later) all have to be installed within the interior of the vent box. As such ...the boat is constructed with one side of the vent box left off to make access for installing all the gear. The last step...is to close the box up by epoxying the last side in place. Yes, you can still get access in there....but it's lots easier with the 4th side left off. That's about where I am at. I should finish installing the last of the equipment  inside the box tomorrow. After that,,,the 4th side will be epoxied on making the box watertight from the actual cabin of the boat. 

Of course...all this work requires a regular donation to West Marine....so Ensign and I went today. Guess we are there WAY too much as Crystal, the Store Manager...is happy to dog sit Ensign for me while I shop! He just turned 6 months old.... based on his current size ....I doubt he will be sailing "Scout" with me! LOL

Sunday, August 25, 2013

Work Continues on "Scout"

"Scout" -Her plans and Build Manual on her deck as she awaits completion

Little by little I am checking off the boxes that need to be checked prior to splashing "Scout" for the first time. I need to get the rigging finalized and to do that I really need to step the mast and raise the sail for the first time. There were a couple minor "issues" I had to deal with prior to getting the sail up for the first time...and they are almost all handled.

The first was installing the grommets in the sail's corners. I had the Spur grommets, but I did not have the right size setting tool to install them. I looked at possibly buying the tool..but after seeing the cost of it...I found a canvas working shop that agreed to set the grommets for me. I dropped off the sail and the grommets with the locations I wanted them installed all marked out. There is one grommet in each of the four corners of the sail.

In this image of "Faith" you can see the top 2 grommet locations and the yard.
 The sail is partially roller furled on the boom.
When I returned the sail was done, all folded nicely and ready for me to pick up. The shop manager, when I asked her what I owed her said.... $5.00.  Wow....these days almost nobody will do anything for $5.00!  Instead I gave her a $20 bill, hoping that if/when I return for some help with something else they will remember me. OK ..I figured the chore of setting the grommets was behind me....moving on.

Improperly set Grommet
I came home and was excited to finally install the sail on the boom and yard. My excitement quickly turned to disappointment when I realized a couple of things.  First...the grommets had all been installed where I had requested, but they were not "set" totally. The spurs were not pushed through the fabric and meshed into the other side of the grommet. I knew I could not leave them like that as they would certainly tear the fabric when under load and rip right out.

The other thing that immediately became apparent was that the yard was short. It was almost the same exact length as the sleeve of the sail and the attachment points were not far enough apart to allow any tension to be placed along the top edge of the sail. Ugh. I measured the yard and compared it to the plans, and sure enough it was just a tad bit short. I suppose I could have left it...but by not having the lines run fore and aft of the installed grommets in the sail...the yard was not secure in place and it could move around fore and aft within the sleeve, and all the while,  the top of the sail was going to be un-tensioned.

Extending the Yard


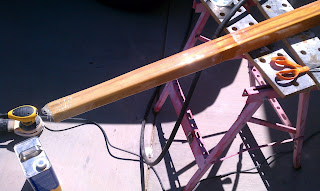
Rummaging around, I found an old hard-wood tiller  that I had from a previous boat and that would never be used again. It's profile was close enough to that of the yard. I cut just an eighth of an inch off the yard to expose raw wood. I then cut a piece of the tiller that would serve as an extension to the yard. A quick trip to the hardware store yielded a  hanger bolt. It looks like two wood screws that had the heads cut off of and were attached to one another with the tips facing opposite direction. I drilled the yard and the new hardwood piece right down their centers longitudinally, then used the hanger bolt to draw the two of them together. Some thickened West System epoxy was applied to the whole deal as it was tightened and aligned. Next the whole unit, which was now one piece, was wrapped barber-pole style in glass tape and resin...followed by glass tape/resin lengthwise.
Yuloh, Yard, and Mast

The yard is now sufficiently long to secure the sail and tension it appropriately. I have to finish up a little sanding and I will prime and paint the new extended tip of the yard.

I removed the sail from the boom and returned it to the canvas shop. They happily finished setting the grommets correctly with an apology that it wasn't done correctly the first time.  No problem, these folks saved me a bunch of $ and time...and did it with a smile. Love folks like that.

Based on what I have read and seen from other Paradox owners....I am going to rig a topping lift to assist in furling the sail and supporting the boom. I ordered a heavy stainless chainplate and I am utilizing that at the back of the boom to install the mainsheet and topping lift both to.
Stainless Chainplate used as tang
I had initially ordered some Racelite tangs for this purpose but I decided that they were too lightweight and if they bent inwards from the pull of the mainsheet, they would prevent the boom from being able to rotate, effectively disabling the roller reefing....one of the features of this boat that makes it so unique. I am hoping that the stiffer chainplate will be strong enough to hold it's shape. For the attachment to the boom....I installed a LONG 5/16 stainless lag bolt that I cut the bolt head off of...and tapped machine threads onto the that end. I installed large stainless fender washers to prevent the chainplate from dragging on the end of the boom as the furler is rotated....and then a nylock nut that allows me to adjust the tension to get rid of play, but not bind up the boom. I then added a stainless acorn nut over the end of the threads. The mainsheet will attach to the bottom and the topping lift to the top of the chainplate.

I'm close now to being able to raise the sail so I can load the furling drum appropriately with line and check that I have a fair run setup for the halyard , furler, and topping lift. I also will then be able to see exactly where the mast/boom/sail interface will be in order to install leather chafe protection for the mast and sail on a port tack.  Once I know that the rigging runs within the vent box are what I am after, I can install the last side of the ventbox and that will finalize making the boat watertight.


I'm thinking a lot about how I want to mount the 2hp Honda...for the times I want it aboard. I'm getting ideas and input from those that have already done it. Here is a picture of the Paradox "Faith" again, sporting the same exact motor I have for Scout. Being in contact with other's like Bill who built Faith, sold her, and who is now restoring another Paradox named "Minnow"  has been invaluable. Click Here for Bill's Blog Bill is in England. Man the Internet is an amazing thing!

 For right now, I am going to just get the boat going as per plans without the outboard attached. I need to get her on the water and learn how to utilize the Yuloh to propel her when not sailing. I think that quite often I will sail her engine-less.....as that is another thing that draws me to this vessel and the whole Micro-Cruising idea.

Weather is supposed to be unseasonably cool and rainy tomorrow. Hope to make some more significant progress. Sept launch is looking do-able for "Scout".


Wednesday, August 21, 2013

Matt Layden's Amazing Designs 
From microcruising.com   Matt Layden Designs Cruising the Bahamas

Matt Layden designed a series of micro-cruisers...each successive one capitalizing on things learned from the previous. Oddly, he has bucked the norm and instead of each successive boat being larger and larger....Matt went the other way...with each boat being smaller and smaller. The capabilities of these boats are amazing and in the right hands his designs have done amazing things. Dave and Mindy Bolduc have owned almost every Layden design, many times purchasing the original from Matt himself. Both Matt and the Bolducs have made numerous trips from Florida to the Bahamas in the boats, crossing the Gulf Stream and spending months cruising the islands. The Bolducs "average" trip to the Bahamas has covered more than 800 miles. Recently Dave did a solo trip in "Enigma" the design that superseded Paradox and is even smaller yet. He did it engine-less and covered tremendous mileage from Florida,  through the Bahamas, all the way to Georgetown in the Exumas and then up South Bight to the west coast of Andros and back. What an incredible trip and display of seamanship! It's all on Dave and Mindy's website at http://www.microcruising.com/


Here is a link to an interview Dave did with Small Craft Advisor way back in 2002 about their travels to that point in their Layden Designed  "Little Cruiser", Paradox's big sister.

 http://www.microcruising.com/sca1.htm 


This kind of demonstration of the ability of the design is what initially attracted me to the Paradox.  Very few people can comprehend what this little craft is capable of unless they really research what it has already done. It truly is a proven camp cruiser beyond and capable of way more adventure than many boats twice it's size ...all while drafting less than a foot of water!

Tuesday, August 20, 2013

Paradox "Scout"-  Back at it again

Paradox "Scout" awaiting her first Splash
After things finally wound down from the Havasu Pocket Cruisers Convention last year, I got to work on Scout. I had purchased her 95% complete. She really did not need a whole heck of a lot to get her ready to go and the work that Lezlie, her previous owner had done was first class. However, as I got into the project a few minor things popped up. Of course they took me longer than they should have. Much of the time was spent scratching my head trying to figure out how to do it. With the onset of summer and 120 degree temps... all work ceased. Well, it's still hot...  115 today....but summer will soon be over. I want Scout ready to go for fall....so I am back on working on her a little at a time.

Mast as I received it with large platform built on top
One of the issues I ran into was a variation from the plans in the mast. The previous owner chose not to make the mast with internal halyards. No big deal. The mast section was completed when I received the boat. Instead of building a sheave into the mast tip as called for by the plans, a stainless eyebolt was inserted into the side of the mast. Above the eye bolt a large wooden structure had been built around the original mast profile that formed a platform for a large anchor light she intended to mount there.

I was going to leave the mast as it was, as my goal was to get sailing, not building...however that's when I ran into a problem. The eyebolt was significantly lower than where the designed sheave would have been....and it was not high enough to raise the yard fully.  That brought me to further inspection of the eyebolt and attachment. The bolt was only bolted through one side of the hollow mast. The more I thought about this, and the subsequent loading it could receive, the more I worried about that style of attachment.

I removed the eyebolt....and consulted with some wooden boat building friends. They suggested using a Racelite block and a strap to attach it to the mast. I ordered the gear thinking that my solution was at hand. When the strap arrived and I saw how tiny the screws would be to hold it....I again was dis-satisfied. I finally decided on another plan, albeit not perfect.

Mast with platform sanded off to original mast section and re-glassed
I removed the structure that had been built on the tip of the mast and brought the mast tip back to its original dimensions. It took some very careful use of a belt sander until the original section re-appeard. I then plugged the tip to make it solid for about 2 feet or so down from the tip. Then I wrapped it in glass and epoxy before starting to build a new section to accept a "mast band".


Gunmetal Mast Bands


I then ordered a gunmetal mast band from the wooden boat chandlery.I figured this band would do a better job of distributing the load to the entire mast structure, rather than to just one side of the hollow mast.  Problem....  Square mast.....Round Mast band.


New solid fiberglass tip ready for Mast Band
I wrapped the mast over and over in solid glass and epoxy until the cross section of the mast was equal to the diameter of the circular section I would need. Then I took a correctly sized hole saw and trimmed it to a round section. Finally I waxed the mast band on the inside multiple times, mixed up some resin with colloidal silica and set the band in place embedded in the thickened resin to get a perfect fit. After it cured I was able to slide the mast band off. I then primed and painted all the new glass on the tip.


New Mast Band in place held by molded lip as well as 4 brass screws into the tip of mast


The attachment for the halyard block is now sufficiently high to raise the yard and I am confident in putting the side loads on the attachment point that it is bombproof (I hope ...LOL  ).  I chose a band with 4 attachments to give me some flexibility. I plan on using a topping lift so at least 2 of the 2 attachment points will be used. 

 Downside....extra weight at the tip which is to be avoided....but I am Ok with it. It's not too bad. 

On to the Next project....

Sunday, August 11, 2013

Getting my Tool Box in Order

Anyone that truly knows me, know that my garage reflects where I a truly am in my life at any one time. When I am feeling good, I am not rushed or overwhelmed by a deadline, and have time to myself ...the garage where I work on my projects is a fun place to be and reasonably organized. 

On the other hand...when I am under the gun, scrambling on some project or maybe more than one....and even more so when I am just not feeling great mentally or physically ...the garage's condition goes downhill. Jo, God bless her, allows me to go through these cycles and never a word is uttered.  I always make sure her bay is clear for for her to park....but sometimes it's tight as my mess sprawls out over the other 2 bays, one of them being 50 foot deep. How or why she puts up with this I will never know. 

To say the garage has been a shambles for the last 5 months would be an understatement. I have been in a funk since losing my best buddy that has been hard to shake. Unless you are a "dog person" that's probably hard to understand...and maybe it's crazy....but that's the way it is. I have not been excited about much and pretty much had to almost force myself to do anything around the house. Of course, anyone that owns a house knows that they are worse than maintaining a boat. They are always in need of yard work, maintenance, cleanup....etc.  And...I let it go. It just was not important. 

I also apparently let myself go. I gained weight that I can barely afford to be carrying around at this age in my profession,  and allowed my conditioning to deteriorate to a point that demands immediate attention on my part. I also found out my blood sugar is high..too high. 

So..  it's time to pull it all back together. 

"Scout" patiently awaiting completion and fall sailing
 The Paradox sits in the garage. I made myself a deal. Once I get all the things I have been neglecting caught up....I can get back to finishing "Scout" so I can sail her this September.  That is one thing that for some reason has remained exciting to me and I can use to motivate myself. The process in underway. As far as "me"....I am on a new dietary plan and am back to working out daily. It's a pain in the ass but I have done it before and the results will come.  As for everything else, well,  the yard was the first thing. That took some serious time...but I have it back where it was a year ago...and once again we can feel good about someone driving by and looking at it. "Dauntless" is all cleaned and put away from the San Juan Cruise. The truck and camper have each had an entire day spent on them cleaning up from the 3800 miles we traveled last month..... and then there's....  the garage.  Yes, the garage. It was so bad that I didn't want the doors to be open to reveal how badly it needed to be cleaned and organized.  Well, today was the start of the garage project.  After a full day I am well on track to getting it back where I need it to be in order for me to feel good enough about it to begin work on the Paradox. 

At the completion of the work tonight I felt frustrated. Frustrated that I allowed this to deteriorate to this level...frustrated that I have been basically "stalled" for 5 months. Yes, we went on vacation and it was great.... but I just have not mentally been in a place I want to be for a long time.  What I finally figured out is that I need NO deadlines for a while. I don't need to be in a place where I am working on any schedule/project other than my regular days at work...and then whatever I feel needs to be done on my days off.  Not having the HPCC going on right now...is actually a Godsend. I don't think I have it in me. My goal right now is to commit to nothing, other than getting my act together. I am not promising anyone that I will be done with the Paradox at any particular time other than the time that suits me,  and the plan can and will change to adjust to my liking....daily if necessary. I'm not promising to be at any location/event at any time other than my scheduled work. I'm not on a deadline to get the boat ready for a trip, I haven't committed to a schedule of sailing with anyone, I'm not working a second job,  or anything else.......and I gotta say .....that feels good. 


My tool box has not looked like this in a LONG time
Seeing my toolbox all organized for the first time in a long,long time....kind of mimics my life I think. I'm working on getting the tool box all cleaned out, organized and ready for a future project. But for right now....getting the toolbox itself organized IS the project. Such is my life right now. It's time I got "my toolbox" in order so I can eventually stand back, take a deep breathe, look at all the blessings I have, and smile. Then we'll make some plans. Till then, one day at a time. I thank God I have such a great gal who is beside me every step of the way....and we have a 50lb, fluffy, white. clown running around the house...driving me crazy, yes  ....but doing his best to find his way into our hearts. He is. 

The garage project continues tomorrow....whenever I feel like getting up. :-) 


Saturday, August 10, 2013

Adjusting Sheets for Changing Breezes


A lot of things have or are changing around this house.


Ensign


'Jo and Ensign in the San Juans
We have a new companion, Ensign, after losing our beloved Bosun. That's a big one. Turns out he's every bit the sailor Bo' was. We found that out while taking him on a 200 miles 2 week cruise through the San Juan and Gulf Islands in BC. At 5 months of age he has a lot to learn but he's brought much needed smiles back the house after the loss of Bo'.


Dauntless


Dauntless awaits the fall or a new owner
Dauntless, sitting alone in the backyard on her trailer, is for sale.  This was a huge decision to make, however, I suppose I really don't want to sell her "that bad" yet. I have set a price on her that is probably too high for most, although she is the only West Coast Montgomery 23 for sale, and one of only 20 ever produced.  If the right buyer comes along, she will go...if not ....we will continue to enjoy her. She's a hell of a boat. Either way is fine with me. If she was to go we have an idea of what we'd like to do....but it can only happen if she sells.

HPCC

 The Havasu Pocket Cruisers Convention  has been put on hold in order to spend some time getting ourselves back together, caught up, and back on track. The sheer size of the event has brought it to a full-time job for 6-7 months a year. Jo and I already have full time jobs....so....  it was getting a bit taxing. Something had to give. For the last 3 or so years things like taking care of the house, vehicles, boats, social life, and even each other....had begun to suffer. I was so far behind the 8 ball on household projects it was not even funny. It was really time for a break last year..but we pushed through one more event at the request of local hospitality vendors who really wanted to see the group return. Unfortunately, this year was the breaking point. So we've taken 2014 off and we will see how it goes for a return, be it in Havasu or some other location, in 2015.  I am glad to report that many are reporting that we will still see them and their boats come this Feb, regardless. That's awesome...and in reality, it makes the HPCC a total success. The first driving factor that it came about from was a desire to get sailboats back out on the waters of Havasu. We did it!


Reality Check

There have been a few "Hey, you are not a kid anymore" medical revelations (for me not Jo), that frankly have not been welcome news. My job requires a certain level of physical conditioning, something that takes more time and effort to maintain as one gets older. I need quite a few more years on an Engine to make to a minimal retirement, and if that is to happen....I can see it's going to demand much more of my attention. Oh to be 20 years old again....lol.


Paradox "Scout"


Scout in Texas prior to purchasing her
The Paradox, "Scout",  is about to become the focus of my attention for a while, as far as sailing goes. She is very close to completion now, and soon the weather will break to cooler temps and drier conditions. My plan is to have her ready for sea trials by the middle of next month. I plan on sailing her extensively this winter. It will be exciting to try this micro-cruising style of sailing. I think many that have seen the boat will be surprised at what she is capable of. What remains to be seen is how much I like it. I expect it will be very very  different from and sailing I have ever done.


'13 Sailing Vacation

We had a great escape from reality this summer, spending over 3 weeks on the road/water with the camper and boat. The San Juan Islands/Gulf Islands Cruise setup by our buddy Larry Yake was awesome. The sailing winds could have been better, and yes it rained (a lot)...but getting to spend 2 solid weeks on the water , in such a beautiful place, with a great group of friends is time making memories. We had 14 boats start the cruise, most of which friends we have cruised with before, and a few new ones. It was a fantastic time. Oh, and did I mention fog?  LOL  ....More about that later.
Dauntless working through Gulf Islands Fog

Blogging...give it a try! 

Most of you that now me , know I talk a lot. I like to share experiences and ideas...and even to relive great memories.
Sometimes I am guilty of taking a soapbox on an issue here or there...and yeah, I am pretty opinionated. :-)  If you read this blog I hope that you will do 2 things:

1. Realize, that  I know I don't have all the answers....and 

2. Take the time to start your own blog and share your experiences with the rest of us.

  I would much rather spend an evening reading about your sailing related escapades, whether it's building a boat, repairing your boat, daysailing, cruising, sharing lessons you learned, etc..than waste my evening on mindless TV.  This blogger.com format is SO SO EASY to do. Give it a try. maybe we can keep each other busy, our faces out of the boob tube, and encourage each other to get out there and live life to the fullest. 

Casting off for now,

Sean