Paradox "Scout"- Back at it again
 |
| Paradox "Scout" awaiting her first Splash |
After things finally wound down from the Havasu Pocket Cruisers Convention last year, I got to work on Scout. I had purchased her 95% complete. She really did not need a whole heck of a lot to get her ready to go and the work that Lezlie, her previous owner had done was first class. However, as I got into the project a few minor things popped up. Of course they took me longer than they should have. Much of the time was spent scratching my head trying to figure out how to do it. With the onset of summer and 120 degree temps... all work ceased. Well, it's still hot... 115 today....but summer will soon be over. I want Scout ready to go for fall....so I am back on working on her a little at a time.
 |
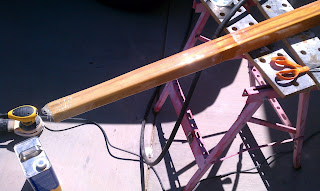
| Mast as I received it with large platform built on top |
One of the issues I ran into was a variation from the plans in the mast. The previous owner chose not to make the mast with internal halyards. No big deal. The mast section was completed when I received the boat. Instead of building a sheave into the mast tip as called for by the plans, a stainless eyebolt was inserted into the side of the mast. Above the eye bolt a large wooden structure had been built around the original mast profile that formed a platform for a large anchor light she intended to mount there.
I was going to leave the mast as it was, as my goal was to get sailing, not building...however that's when I ran into a problem. The eyebolt was significantly lower than where the designed sheave would have been....and it was not high enough to raise the yard fully. That brought me to further inspection of the eyebolt and attachment. The bolt was only bolted through one side of the hollow mast. The more I thought about this, and the subsequent loading it could receive, the more I worried about that style of attachment.
I removed the eyebolt....and consulted with some wooden boat building friends. They suggested using a Racelite block and a strap to attach it to the mast. I ordered the gear thinking that my solution was at hand. When the strap arrived and I saw how tiny the screws would be to hold it....I again was dis-satisfied. I finally decided on another plan, albeit not perfect.
 |
| Mast with platform sanded off to original mast section and re-glassed |
I removed the structure that had been built on the tip of the mast and brought the mast tip back to its original dimensions. It took some very careful use of a belt sander until the original section re-appeard. I then plugged the tip to make it solid for about 2 feet or so down from the tip. Then I wrapped it in glass and epoxy before starting to build a new section to accept a "mast band".
 |
| Gunmetal Mast Bands |
I then ordered a gunmetal mast band from the wooden boat chandlery.I figured this band would do a better job of distributing the load to the entire mast structure, rather than to just one side of the hollow mast. Problem.... Square mast.....Round Mast band.
 |
| New solid fiberglass tip ready for Mast Band |
I wrapped the mast over and over in solid glass and epoxy until the cross section of the mast was equal to the diameter of the circular section I would need. Then I took a correctly sized hole saw and trimmed it to a round section. Finally I waxed the mast band on the inside multiple times, mixed up some resin with colloidal silica and set the band in place embedded in the thickened resin to get a perfect fit. After it cured I was able to slide the mast band off. I then primed and painted all the new glass on the tip.
 |
| New Mast Band in place held by molded lip as well as 4 brass screws into the tip of mast |
The attachment for the halyard block is now sufficiently high to raise the yard and I am confident in putting the side loads on the attachment point that it is bombproof (I hope ...LOL ). I chose a band with 4 attachments to give me some flexibility. I plan on using a topping lift so at least 2 of the 2 attachment points will be used.
Downside....extra weight at the tip which is to be avoided....but I am Ok with it. It's not too bad.
On to the Next project....


No comments:
Post a Comment